RubyMotion is a neat tool that allows you to build iOS apps using Ruby code that eventually gets compiled into Objective-C. Unfortunately, there aren’t a ton of blog posts demonstrating how to implement some of the more basic features of an iOS app using the Objective-C APIs, so hopefully this post will be of some use to aspiring RubyMotion developers. I’m assuming basic or better Ruby knowledge, and I definitely recommend checking out this tutorial for more of the basics.
Let’s get started building our login screen by making a new RM app:
1
| |
And don’t forget to cd into the directory.
First we’ll get our app_delegate.rb into basic working order. But before that, a quick note: one issue I have with most of the RM samples I’ve found is that they cram everything into app_delegate.rb. I haven’t figured out if this is a reflection of how iOS apps are built in Objective-C, or just for the convenience of demoing code, but as Rubyists let’s try and work toward better adherence to MVC.
We’re going to initialize a window to hold our views, then initialize our login controller and a navigation controller to manage it.
1 2 3 4 5 6 7 8 9 10 11 12 | |
If you rake now, the compiler will complain since we haven’t actually created our login controller, so let’s go ahead and make one in app/controllers:
1 2 | |
This will get us… a blank screen. Exciting! Time to start on our login. We’ll start by overriding the viewDidLoad method, a UIViewController callback that gets called after a controller’s view is loaded into memory. Inside it, we’ll add a subview to the root view that’ll hold our text fields and login button.
1 2 3 4 5 6 7 8 9 10 11 | |
Again our compiler will complain here because we haven’t defined our LoginView, let’s do that now in app/views:
1 2 | |
Before we move on, I want to introduce Teacup, a handy gem that allows you to extract some of the verbose aesthetics related methods into stylesheets. The easiest way to do this is with bundler. In your rakefile:
1 2 3 4 5 6 | |
Then create a Gemfile in the root of your app and add:
1 2 3 4 | |
And run bundle on the command line.
1
| |
Let’s take teacup out for a spin. Similar to the controller’s viewDidLoad method, we override the view’s initWithFrame method to work our own subview and styling elements in. Let’s start by setting up a white background. In the view:
1 2 3 4 5 6 7 8 9 10 | |
Now let’s setup our stylesheet in app/styles:
1 2 3 4 | |
Ok! We finally have our blank white screen! Let’s get started by adding a container for our login interface. Teacup provides a simple DSL to implement and scaffold views. We’re going to initialize a new UIView object to act as our container, then set its dimensions in our stylesheet. The subview command (which Teacup provides) accepts an object and a symbol that points to the appropriate ‘styles’ to add to that object, as defined by the stylesheet.
1 2 3 4 5 6 7 8 9 10 11 12 13 14 15 16 17 18 19 20 21 22 | |
At this point, launching our app with rake will show no visible changes, however if you hold down the command key and mouse over the middle of the screen, a red box, our container, should be highlighted. It’s also worth taking a second to decode what we’re doing to set the position and dimensions of our frame in the stylesheet. A view’s location is defined relative to its superview- in this case the entire window since that’s what we passed into the initWithFrame method. The first array represent the x/y coordinates of the top left point of our container, and the second array represents the width and height. This relative relationship will become more clear when we create our text fields, which will be subviews of our container. Let’s do that now using Teacup’s handy block syntax:
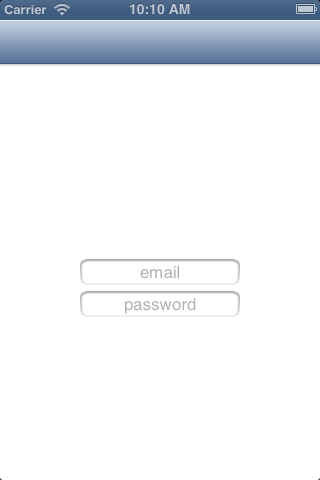
1 2 3 4 5 6 7 8 9 10 11 12 13 14 15 16 17 18 19 20 21 22 23 24 25 26 27 28 29 30 31 32 33 34 35 | |
Finally, something of substance!
However, you might notice that when we actually click into the text field, the keyboard pops up and blocks the field itself…not a great user experience. Let’s get to work fixing that using animations, which will shift our view appropriately up and down so our user can see what they’re typing.
We’ll tap into more callbacks to achieve this effect. The textFieldDidBeginEditing method is, as the name implies, triggered whenever a text field is selected for editing. We’ll use this, and a UIView animation, to replace the container’s frame with a new one positioned so the user can see the text fields.
1 2 3 4 5 6 7 8 9 10 11 12 13 14 15 16 17 18 19 | |
To actually get this working, we need to set our text fields’ delegates to themselves. More on what this is doing (here)[http://developer.apple.com/library/ios/#documentation/General/Conceptual/DevPedia-CocoaCore/Delegation.html].
1 2 3 4 5 6 7 8 9 10 11 12 13 | |
Now if you rake and click into one of the text fields, the fields should shift up and remain visible.
Let’s finish this off by implementing the reverse- if a user has finished entering info, shift the container back down. We’ll also make it so that clicking the return button in the email field shifts the cursor to the password field. We’ll use textFieldShouldReturn, which determines how the processing of the return button should be handled.
1 2 3 4 5 6 7 8 9 10 11 12 13 14 15 16 17 18 19 20 21 22 23 24 | |
And that’s it! Run rake and take the new login screen for a test drive. Here’s all the code in one place.